BMW Rear Electronic Module Wiring Diagram to Xhorse VVDI Prog

If a BMW 3 series, i.e F35 fails to open trunk, in most cases this is caused by data loss in the CPU MPC5515 of the REM (Rear Electronic Module).


You can read the CPU data, modify and write the modified data to repair the REM module.


Repair BMW REM Module with Xhorse VVDI Prog 1


Repair BMW REM Module with Xhorse VVDI Prog 2

Both Xhorse VVDI Prog and Multi Prog will read and write the module.

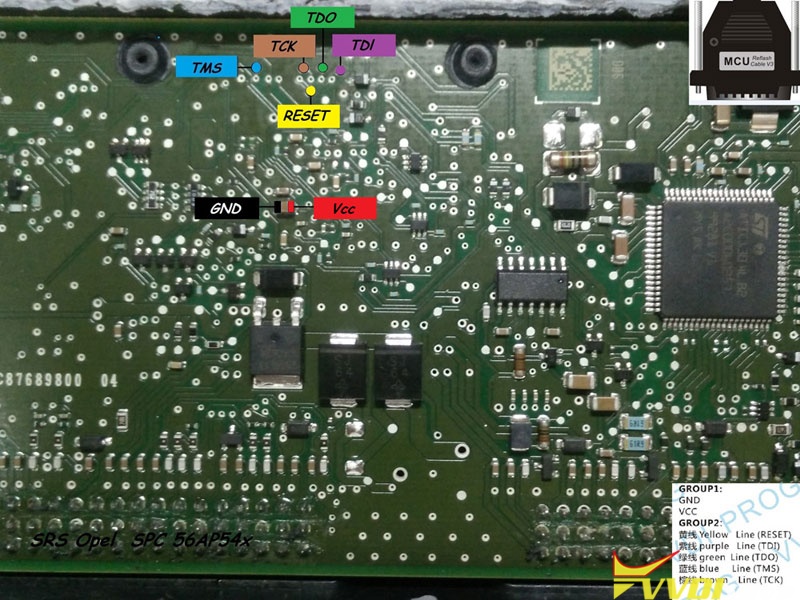
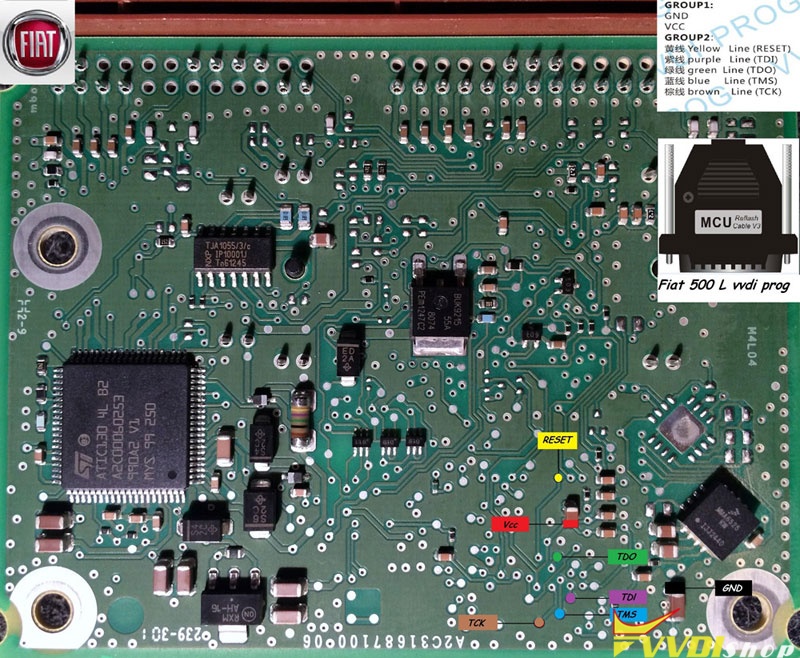
BMW REM module wiring diagram to Xhorse VVDI Prog/Multi Prog

Repair BMW REM Module with Xhorse VVDI Prog 3
REM=REAR ELECTRONIC CONTROL MODULE
MPC5515
CPU ID=1D6011181D10D107
Need to add a 100-120 ohm resistor between VCC and JCOM!!!

 Repair BMW REM Module with Xhorse VVDI Prog 4

Repair BMW REM Module with Xhorse VVDI Prog 5

In VVDI Prog software, select Microcontroller -Motorola MPC55 series- MPC5515.

Repair BMW REM Module with Xhorse VVDI Prog 6

Multi prog works as well.


Repair BMW REM Module with Xhorse  multi prog 1


Repair BMW REM Module with Xhorse  multi prog 2


Repair BMW REM Module with Xhorse  multi prog 3

Xhorse VVDI Prog Clone Ford Focus 2009-2010 Cluster

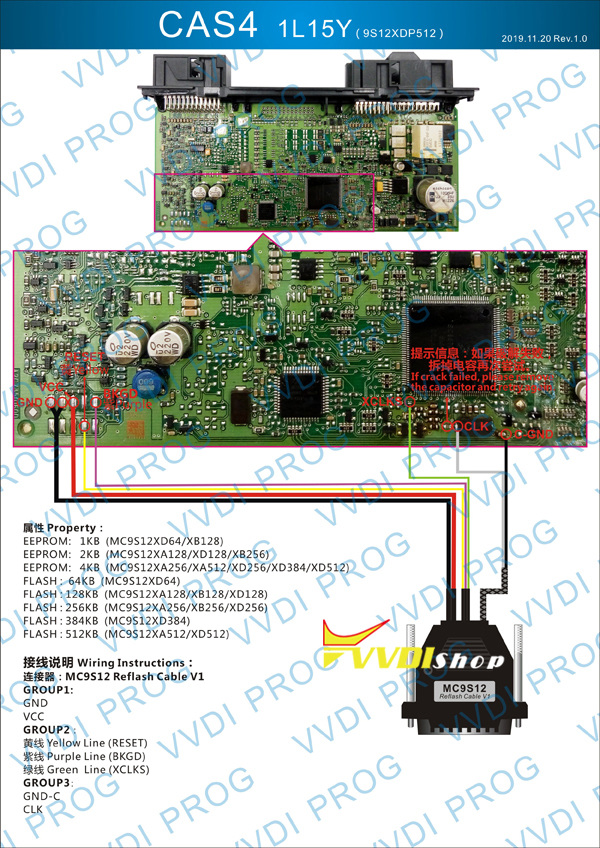
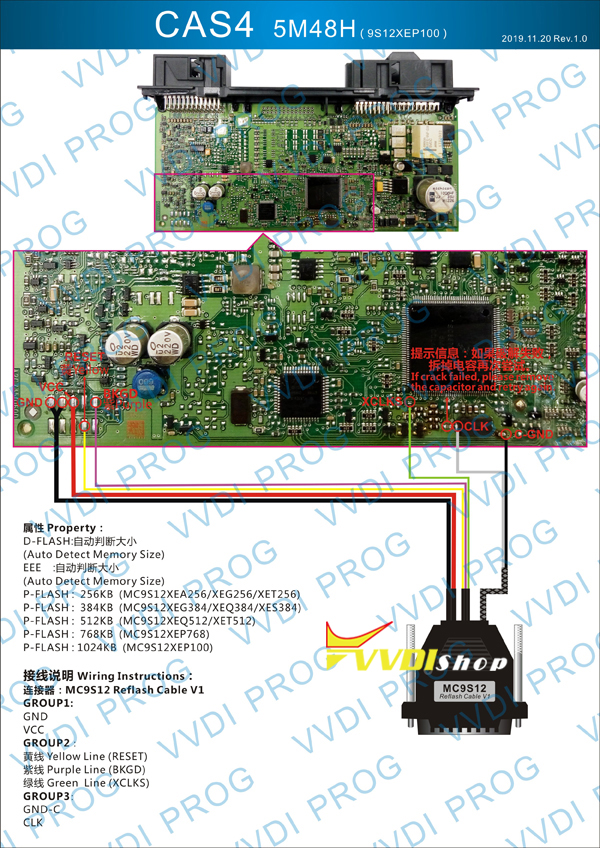
In this tutorial, we’ll walk through the process of cloning a Ford Focus MK2 instrument cluster (Part No.: 8V4T-10849-HH) by reading and writing its EEPROM and Flash data using the Xhorse VVDI Prog tool. This procedure is useful for replacing a faulty cluster or performing repairs while retaining the original vehicle data.


Tools Required

  1. Xhorse VVDI Prog

  2. MC9S12 Cable

  3. Screwdriver/Pry Tool (to open the cluster housing)

  4. Replacement Cluster (same part number as the original)


Step-by-Step Procedure

1. Accessing the Instrument Cluster

  • Remove the instrument cluster from the dashboard by gently prying it out. Releasing the clips on both sides allows the cluster to slide out easily.

  • Once removed, locate the EEPROM and Flash memory chips on the circuit board.

Xhorse VVDI Prog Clone Ford Focus 09-10 Instrument Cluster 1

Xhorse VVDI Prog Clone Ford Focus 09-10 Instrument Cluster 2

2. Connecting VVDI Prog

  • Use the MC9S12 cable to connect the cluster to the VVDI Prog tool.

Xhorse VVDI Prog Clone Ford Focus 09-10 Instrument Cluster 3

  • Follow the pinout diagram in the software to ensure correct wiring:

    • Power (VCC)

    • Ground (GND)

    • Reset (RST)

    • Communication lines (PCC, etc.)

Xhorse VVDI Prog Clone Ford Focus 09-10 Instrument Cluster 4


Xhorse VVDI Prog Clone Ford Focus 09-10 Instrument Cluster 5


Xhorse VVDI Prog Clone Ford Focus 09-10 Instrument Cluster 6


Xhorse VVDI Prog Clone Ford Focus 09-10 Instrument Cluster 7


Xhorse VVDI Prog Clone Ford Focus 09-10 Instrument Cluster 8


3. Reading EEPROM & Flash Data

  • Open VVDI Prog software and select the Ford Focus 09-10 dashboard option.

  • Click “Read” to extract:

    • EEPROM data and save.

    • Flash data (saved separately)

  • Verify that the readings are successful before proceeding.

Xhorse VVDI Prog Clone Ford Focus 09-10 Instrument Cluster 9

Xhorse VVDI Prog Clone Ford Focus 09-10 Instrument Cluster 10


Xhorse VVDI Prog Clone Ford Focus 09-10 Instrument Cluster 11


Xhorse VVDI Prog Clone Ford Focus 09-10 Instrument Cluster 12


4. Writing Data to the New Cluster

  • Once the replacement cluster arrives, connect it to VVDI Prog.

Xhorse VVDI Prog Clone Ford Focus 09-10 Instrument Cluster 13

  • Load the previously saved EEPROM and Flash files and click “Write” to transfer the data.

  • Ensure all mileage, immobilizer, and settings match the original cluster.

5. Reinstalling the Cluster

  • Carefully reinstall the cloned cluster into the dashboard, securing all clips.

  • Test the cluster by turning on the ignition to confirm functionality.


Important Notes

  • Compatibility is critical—the replacement cluster must have the exact same part number.

  • Improper wiring or data transfer may corrupt the cluster, so double-check connections.

  • This process may require additional coding for full vehicle integration (e.g., immobilizer sync).


www.vvdishop.com

VVDI Prog Reset Ford EcoSport Airbag GN15-14B321-KB

How-to guide: Xhorse VVDI Prog read Ford airbag SRS control unit GN15-14B321-KB to clear airbag crash.

Model: Ford Ecosport

Airbag part number: GN15-14B321-KB

Memory type is Infineon TriCore SAK-TC222S-16F.

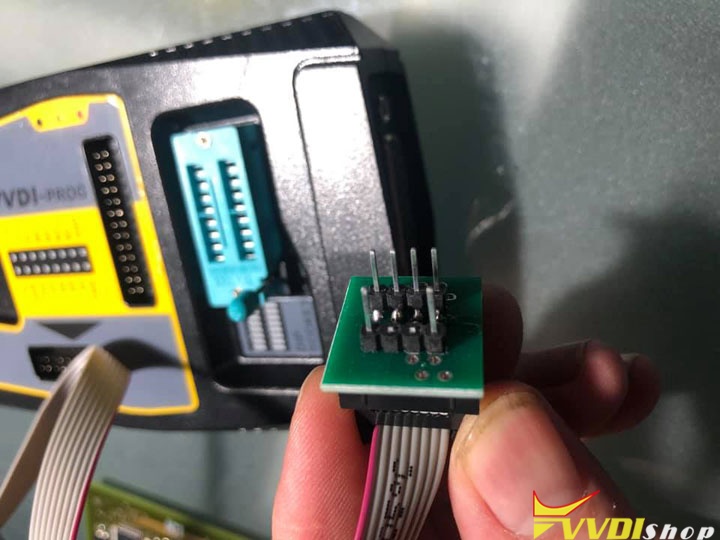
Device to read: Xhorse vvdi prog or multi prog


Xhorse VVDI Prog Read Ford Airbag GN15-14B321-KB 1


Xhorse VVDI Prog Read Ford Airbag GN15-14B321-KB 2


Xhorse VVDI Prog Read Ford Airbag GN15-14B321-KB 3


Connect airbag module with vvdi prog via mcu3 reflash cable.

Xhorse VVDI Prog Read Ford Airbag GN15-14B321-KB 4

Xhorse VVDI Prog Read Ford Airbag GN15-14B321-KB 5

In vvdi prog, select MCU- INFINEON TC2XXX- TC22X-16F (JTAG)


Xhorse VVDI Prog Read Ford Airbag GN15-14B321-KB 6


Xhorse VVDI Prog Read Ford Airbag GN15-14B321-KB 7


Read DFLASH and Pflash data respectively.

Xhorse VVDI Prog Read Ford Airbag GN15-14B321-KB 8

Xhorse VVDI Prog Read Ford Airbag GN15-14B321-KB 9

Repair Audi Air Suspension Module by Xhorse VVDI Prog

Here is the Audi Air Suspension Control Unit.

Xhorse VVDI Prog Flashes Audi Air Suspension Control Unit 1


It has 2 micro chips.

Xhorse VVDI Prog Flashes Audi Air Suspension Control Unit 2

The first microcontroller.

Xhorse VVDI Prog Flashes Audi Air Suspension Control Unit 3

The second microcontroller.

In general, there was a problem that at a speed of over 120 km/h, the air suspension dropped into an error for all 4 level sensors, when dropping below 120 km/h, all errors disappeared. It was decided to reflash the unit. It contains 2 Motorola microcontrollers. Xhorse VVDI Prog programmer can flash and read them.


General appearance

Xhorse VVDI Prog Flashes Audi Air Suspension Control Unit 4

Xhorse VVDI Prog Flashes Audi Air Suspension Control Unit 5

Connect module with vvdi prog.

Read and write Motorola MC912D60 secured chip.

Xhorse VVDI Prog Flashes Audi Air Suspension Control Unit 6

Xhorse VVDI Prog Flashes Audi Air Suspension Control Unit 7


Updated!
The firmware flash helped! There are no errors when increasing the speed. I was driving at 160 km/h and the car dropped to the first position.


www.vvdishop.com

Read 2024 Hyundai Airbag R7F701042 with Xhorse VVDI Prog?

Today we received an 2024 Hyundai airbag module. We’re gonna reset it with Xhorse VVDI PROG on bench. Before that, we should read and save its DFLASH & CFLASH of the module.


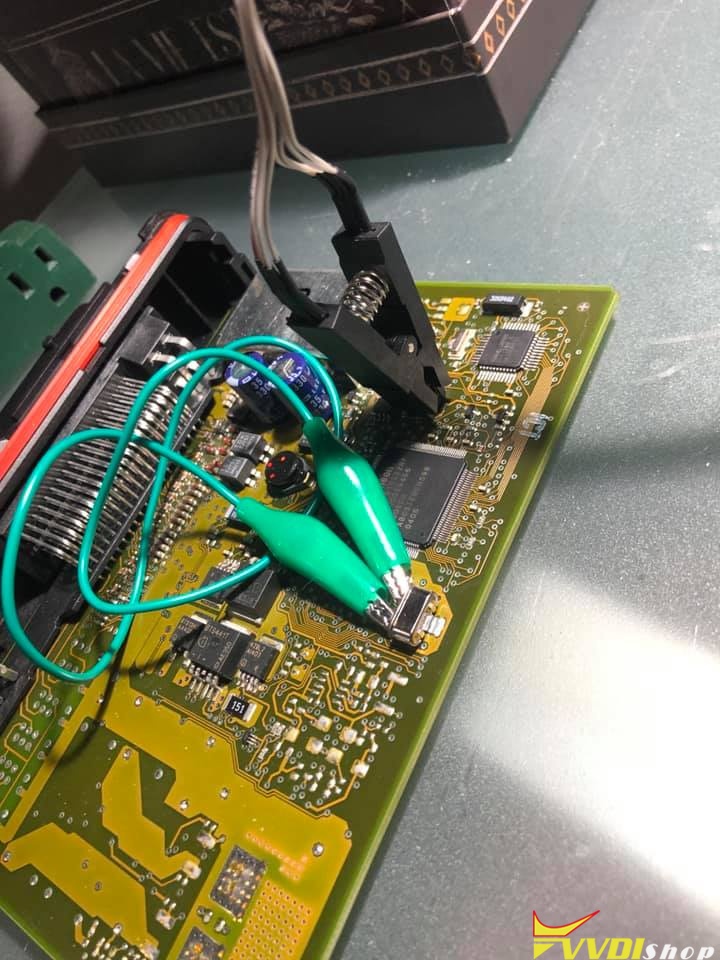
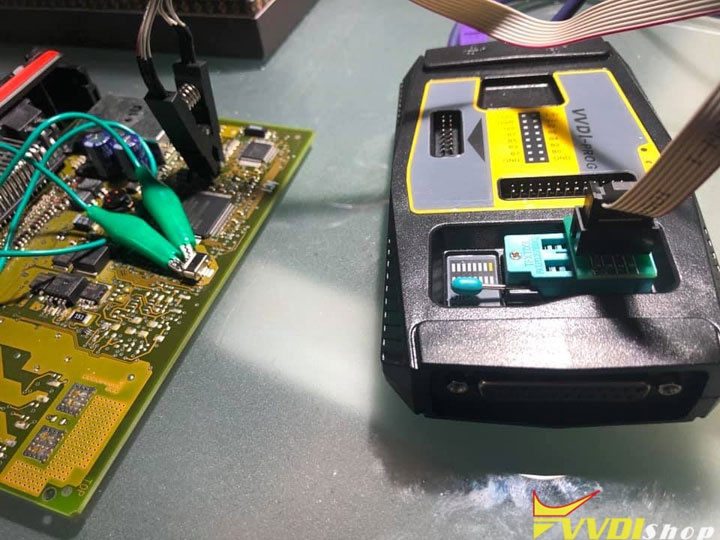
First, we’ll do its connection.

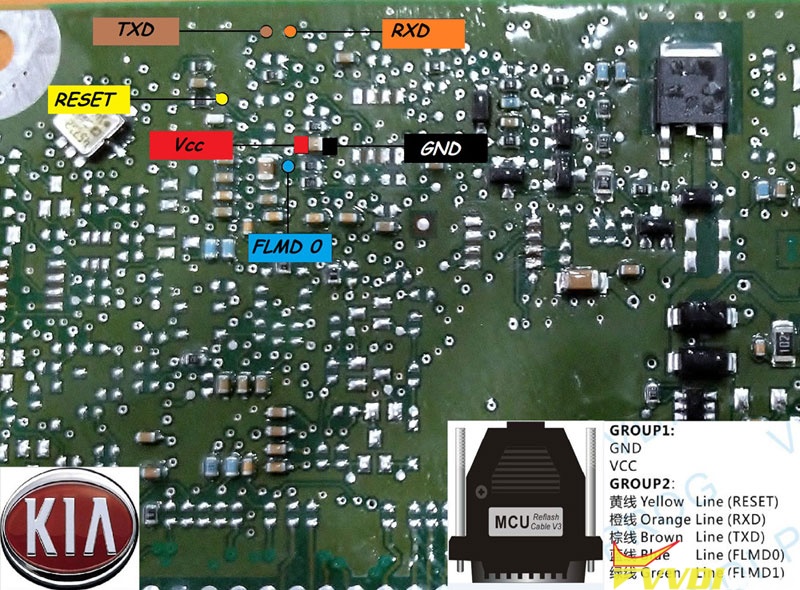
Connect VVDI PROG& airbag module according to wiring diagram.


Xhorse VVDI PROG Read 2024 Hyundai Airbag RH850 1


Xhorse VVDI PROG Read 2024 Hyundai Airbag RH850 2


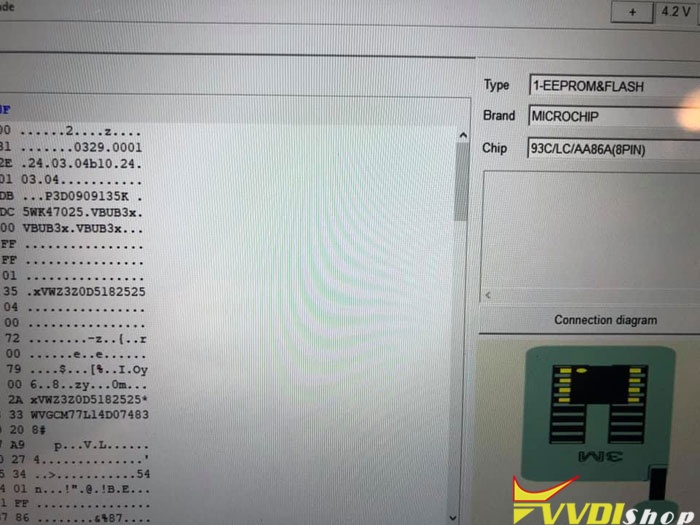
Second, Open VVDI PROG software.

Type: 2-MCU

Brand: RENESAS-RH850

Chip: R7F701042

Read DFLASH…

The module is working, the frequency has been matched now.

Read DFLASH success.

Save DFLASH data file.


Read CFLASH…

Read CFLASH success.

Save CFLASH data file.

Xhorse VVDI PROG Read 2024 Hyundai Airbag RH850 3

Xhorse VVDI PROG Read 2024 Hyundai Airbag RH850 4

Xhorse VVDI PROG Read 2024 Hyundai Airbag RH850 5

Xhorse VVDI PROG Read 2024 Hyundai Airbag RH850 6

www.vvdishop.com

Xhorse VVDI Prog Read Siemens Kessy Module 93C86 In Circuit

Some people are having hard time with 93c86 in circuit, and even problems with it out of circuit on adapter, especially on early siemens since no diagram in xhorse vvdi prog for soldering wires to board only continental.
Usually vvdi prog failed to read all the all the 93C86 under ST and other manufacturers. Here’s the tip to do kessy modules 93C86 Touareg/A8/Porsche in circuit with vvdi-prog if failing to read all the all the 93C86 under ST and other manufacturers.
For the continental you can always solder the wires following diagram and never have problem but for Siemens there’s no diagram so have to go straight to chip.
You have to chop the 6 and 7 pins on the clip off and read as microchip 93C/LC/AA86A remember to bridge the crystal as well.
This is a Siemens VDO showing pictures of, and that the continental you would just follow diagram in vvdiprog on soldering wires straight to board to read that style.
vvdi-prog-read-Kessy-93C86-1


vvdi-prog-read-Kessy-93C86-2


vvdi-prog-read-Kessy-93C86-3


vvdi-prog-read-Kessy-93C86-4


vvdi-prog-read-Kessy-93C86-5
Credit to Mr. FaGalde.

Renault Opel VW SRS Pinouts to VVDI Prog

Here are some airbag pinouts to some important vehicles (European vehicles mainly) that don’t show in Xhorse vvdi prog programmer.  Thanks to @ s qubiak for sharing.
Renault / Dacia SPC560
Pinout xprog edit for vvdi
Test ok
vvdi-prog-Renault-Dacia-SPC560-1


vvdi-prog-Renault-Dacia-SPC560-2
Opel SPC 56AP54x
Pinout CPT edit for vvdi prog
Opel SPC 56AP54x vvdi prog
Fiat 500 L
SRS MPC/SPC
CPT edit for vvdi prog
Fiat 500 L MPC/SPC vvdi prog
Dacia / Renault SPC560P50L3 V2
pinout CPT edit for VVDI-prog
Dacia / Renault v2 vvdi prog
Dacia /Renault v3 (SPC560P50L3_V3)
pinout CPT edit for vvdiprog
Dacia /Renault v3
Skoda SPC5604-114pin
pinout CPT edit for VVDI prog
Skoda SPC5604-114pin
Kia NEC D70F3628
pinout CPT edit for VVDI prog
Kia NEC
VW renesas v850 SRS 70F3466(70F3424)
pinout CPT edit for VVDI prog
VW renesas v850 vvdi prog
Keep updating…

VVDI Prog BMW CAS4 No Remove Component Pinouts

Xhorse VVDI Prog V4.8.8 adds BMW CAS4 1L15Y 5M48H read/write without removing components.
+ Add CAS4-1L15Y-CERAMICS, CAS4-1L15Y-METAL-NO-NEED-REMOVE-COMPONENTS PICTURE in<4-IMMOBILIZER>-><BMW>-><CAS4-1L15Y>
+ Add CAS4-5M48H-CERAMICS, CAS4-5M48H-METAL-NO-NEED-REMOVE-COMPONENTS PICTURE in<4-IMMOBILIZER>-><BMW>-><CAS4-5M48H-R/W/UNLOCK>
+ Add CAS4-5M48H-CERAMICS,CAS4-5M48H-METAL-NO-NEED-REMOVE-COMPONENTS PICTURE in<4-IMMOBILIZER>-><BMW>-><CAS4-5M48H-FORCE-UNLOCK>
+ Add CAS4-5M48H-CERAMICS,CAS4-5M48H-METAL-NO-NEED-REMOVE-COMPONENTS PICTURE in<4-IMMOBILIZER>-><BMW>-><CAS4-1N35H-BACKUP>
+ Add CAS4-5M48H-CERAMICS, CAS4-5M48H-METAL-NO-NEED-REMOVE-COMPONENTS PICTURE in <4-IMMOBILIZER>-><BMW>-> <CAS4-1N35H-R/W/UNLOCK>
+ Add CAS4-5M48H-CERAMICS, CAS4-5M48H-METAL-NO-NEED-REMOVE-COMPONENTS PICTURE in <4-IMMOBILIZER>-><BMW>-><CAS4-1N35H-FORCE-UNLOCK>
VVDI Prog BMW CAS4 No Need Remove Components Wiring Connections
vvdi-prog-bmw-cas4-no-remove-component-1


vvdi-prog-bmw-cas4-no-remove-component-2


vvdi-prog-bmw-cas4-no-remove-component-3


vvdi-prog-bmw-cas4-no-remove-component-4
Customer feedback:
I tested new update CAS4 5m48h:
without removing any component – read backup FAIL to crack
with removing only 1 resistor – read backup SUCCESS 
green soldered wrongly
green wire need connect to other side of resistor (check from vvdi prog diagram)
That’s very good job by xhorse.
vvdi-prog-bmw-cas4-no-remove-component-5


vvdi-prog-bmw-cas4-no-remove-component-6
Xhorse engineer Samic’s suggestion:
mostly of those types no need to remove components, but maybe few of CAS4 the component affected on clock signal, better to remove it if crack failed.
vvdi-prog-bmw-cas4-no-remove-component-7
http://www.vvdishop.com/service/vvdi-prog-bmw-cas4-no-remove-component-pinouts.html